The Three-Headed Protector, A Journey into Kerberos Authentication
KERBEROS | The three-Headed Protocol!
Hey there, fellow curious minds! Today, we’re diving into the fascinating world of Kerberos. Ever heard of it? If not, no worries - we’re about to unpack it together!
In this blog, I’ll take you on a journey through the ins and outs of Kerberos. Spoiler alert: it’s not as complicated as it might seem!
So, buckle up and get ready to embark on this Kerberos adventure with me. Trust me, it’s going to be a wild ride! Let’s dive in!
What is Kerberos :
Let’s start by breaking it down a bit.
In a nutshell:
- A protocol for authentication
- Involve a trusted 3rd-party
- built on symmetric-key cryptography
In detail:
In Greek mythology, Kerberos (Cerberus) is famously known as the three-headed dog guarding the gates of the underworld.
In the realm of computer science, Kerberos is a network authentication protocol designed to allow users (or clients) to securely access services within an untrusted network environment. Drawing a parallel to the myth, the three heads in the protocol symbolize the client, the service being accessed, and the third-party mediator known as the Key Distribution Center (KDC).
In my learning journey, I’ve always found it essential to understand the “why” behind things. So, let’s dig into the “Why” of Kerberos and explore the factors that led to its creation.
Before Kerberos:
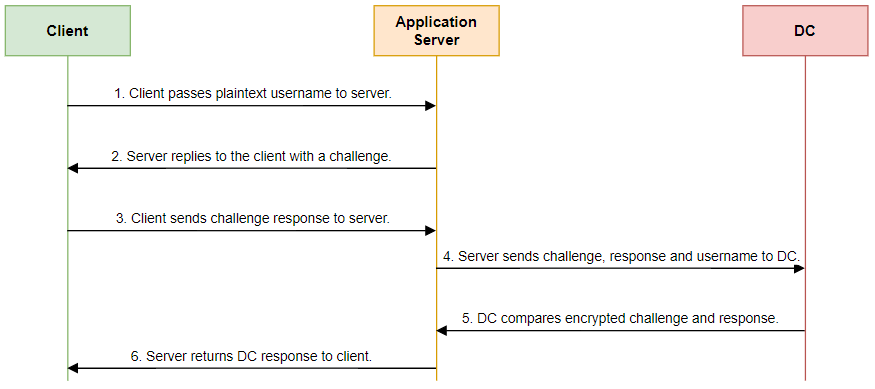
Before Kerberos, Microsoft relied on a protocol known as NTLM (New Technology LAN Manager) to handle authentication. NTLM operated on a challenge-response system, where users would receive a random number challenge from server. They would then encrypt this challenge with their password and send it back to the Domain Controller (DC) for verification.
However, there was a glaring weakness in NTLM: it transmitted all messages without encryption. This vulnerability left the protocol wide open to various risks and attacks, including the notorious Man-In-The-Middle and pass-the-hash attacks. These vulnerabilities posed significant security threats, making NTLM far from ideal for ensuring secure authentication.
In future blogs we might dive deeper into these attacks and explore how Kerberos stepped in to offer a more robust solution.
Kerberos has been the default Windows authentication system since 2000. This means that anyone with a Windows or Mac operating system has Kerberos installed as part of the package. However, it’s important to note that individuals would only utilize Kerberos if they are part of an organization that employs Kerberos for authentication purposes.
And now, the moment we’ve all been eagerly waiting fot (well, at least I have) - let’s plunge into the Kerberos workflow!
How Kerberos works?
Before we delve into how Kerberos works, let’s define some key components that you must know:
- Kerberos Realm : A realm, created by administrators, contains clients and all the services they may have access to. You may not have access to certain services or host machines defined by the policy management (as a developer, you should not access any financial-related services).
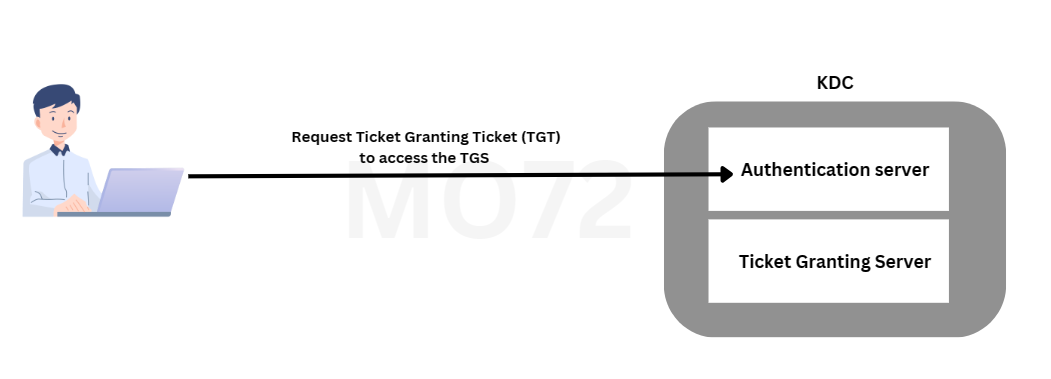
- KDC (Key Distribution Center) : As its name indicates, it is a center responsible for granting authentication tickets and session keys. It consists of two main services (which may be on separate servers, but it’s not necessary):
- Authentication server : Responsible for verifying the identity of the client (we will delve into that later).
- Ticket Granting Server (TGS) : It takes care of service verification and then grants a ticket to the client to access the service.
We mentioned earlier three entities within Kerberos:
- Client : This could be a user or a service of a software
- Server/service : This refers to the resource that the client wants to access.
- KDC (Key Distribution Center): The trusted third-party authentication service.
Now let’d dive in :
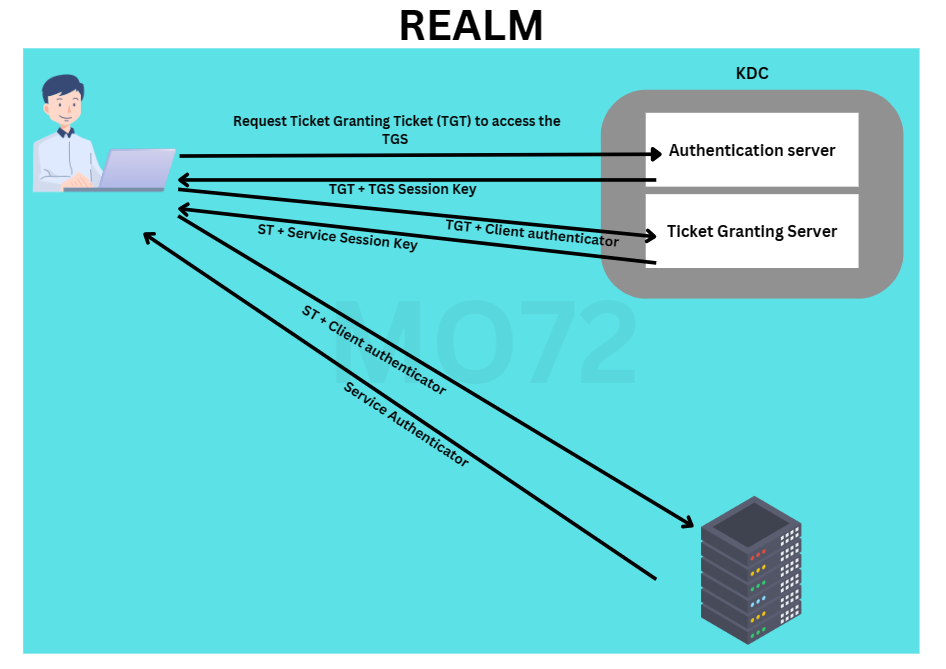
Between the client and the authentication server :
When a user wants to access a service, they send a simple request to the Authentication Server in the Key Distribution Center (KDC). This request includes:
- Their username/ID
- The name/ID of the service they want to use
- Their IP address
- How long they’d like the access to be valid (though the server might have its own rules about that).
When the Authentication Server receives the request, it first checks if the username/ID exists in its database. If it does, the server generates a random key (TGS session key) to be used between the user and the Ticket Granting Server (TGS).
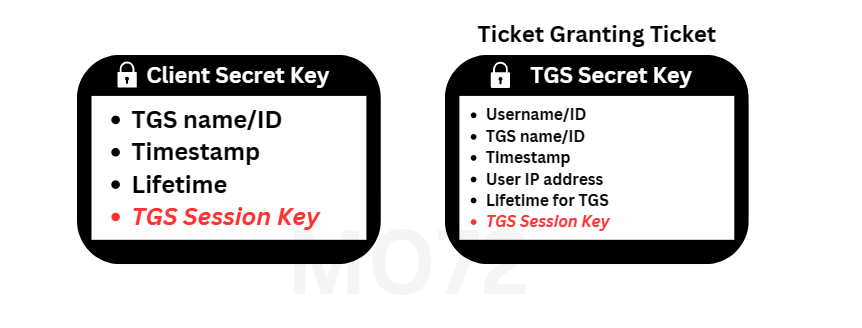
After generating the TGS session key, the Authentication Server creates two messages:
Ticket Granting Ticket (TGT): This contains information about the user, the TGS session key, and other relevant details needed for accessing services. The second message is sent to authenticate the user (we will discuss the process shortly).
The two messages are described as follows:
The first message serves to verify the identity of the client. It’s encrypted using the client’s secret key, generated using their password stored in the KDC database, along with a salt (e.g., password+username@REALMNAME.com). When sent to the user, they must enter their password to decrypt it.
The other message is the TGT (Ticket Granting Ticket), encrypted by the secret key of the TGS server, which the client doesn’t have access to.
When the client receives the two messages, it will be prompted to enter its password. If the password is correct, the client can decrypt the first message. Upon decryption, the client obtains the TGS session key.
So far, we’ve covered the authentication server. Now, let’s move on to obtaining some other tickets from the TGS.
Between the client and the Ticket Granting Server (TGS) :
Once the user has the TGT message encrypted, they will prepare another message called an authenticator. This authenticator contains the following:
- username/ID
- timestamp
The user then encrypts this authenticator with the TGS session key obtained earlier and sends it along with the TGT to the Ticket Granting Server (TGS).
The TGS can decrypt the TGT with its secret key and retrieve the TGS Session Key, which is used to decrypt the authenticator sent by the user. (Feel free to reread it again if it seems unclear )
Next, the server verifies if the requested service exists in the KDC database. If it does, the server performs the following checks:
- Compares the timestamp in the authenticator to that of the TGT (the Kerberos system tolerates a difference of 2 minutes).
- Checks the TGT lifetime to see if it has expired.
- Ensures that the authenticator is not already present in the TGS’s cache to prevent replay attacks.
- Compares the IP address in the authenticator with that in the TGT.
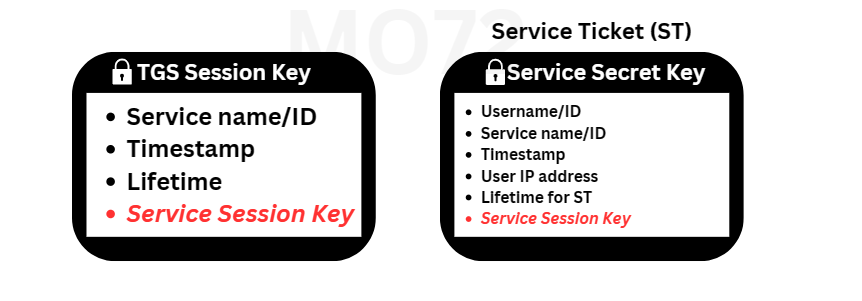
If all checks pass, the server proceeds to generate another random session key called the Service Session Key and prepares two messages:
The user can decrypt only the first message encrypted using the TGS Session Key, but not the Service Ticket (ST). So, the user will obtain the Service Session Key to initiate the final phase. Let’s move to the final part of the Kerberos process.
Between the client and the Service :
Alongside with the encrypted Service Ticket (ST) and the Service Session Key that the client possesses, the user will prepare another authenticator similar to the previous one. This authenticator includes:
- username/ID
- timestamp
The user then encrypts this authenticator with the Service Session Key and sends both the encrypted ST and authenticator to the service.
Similar to the Ticket Granting Server (TGS), the Server or Service decrypts the messages using its secret key to obtain the Service Session Key. With this key, it decrypts the authenticator and proceeds to conduct the following checks:
- The timestamp in the authenticator is compared to that of the Service Ticket (ST), with the Kerberos system tolerating a difference of 2 minutes.
- The ST lifetime is checked to ensure it hasn’t expired.
- The authenticity of the authenticator is verified to prevent replay attacks.
- The IP address in the authenticator is compared with that in the ST.
Assuming all these checks pass, we’re almost at the finish line. But there’s just one more message to go, (Last one, I promise!)
The service prepares and sends its own authenticator, containing the name of the service and a timestamp encrypted with the Service Session Key.
The user decrypts this message and verifies that it’s indeed the service they were seeking. And just like that, it’s a wrap! The user is now securely connected to the service.
All the messages and exchanges will resemble the layout depicted in the following image:
Future requests will utilize the cached Service Ticket (ST) as long as it remains valid.


Comments powered by Disqus.